

Как измерить износ цепи штангенциркулем
Тот, кто катает много и кто знает о таком явлении как износ компонентов, бывает что и задается вопросом: а насколько часто нужно менять цепь? Задавшись целью это выяснить, новичок лезет на форумы с этим вопросом и... еле-еле уносит оттуда ноги! Советчиков море, и кто во что горазд рекомендовать "правильные" интервалы замены цепи, кассеты, системы, рамы, амортизатора и даже катафот на переднем колесе. Хотя их никто об этом не спрашивал.
Особо умные (в хорошем смысле слова) байкеры дают ссылку на растиражированный с www.bike-repair.ru материал, в котором умудренные летами байкеры со стажем говорят, что длина двенадцати полных звеньев цепи в нулевом состоянии должна составлять 304,8 мм, а рекомендуемое значение износа цепи, при котором ее нужно менять, составляет столько и столько... (ниже процитирую). Одно но: для точности измерения цепь неплохо бы снять с велика, вымыть и высушить, а еще измерять ее строго по центрам пинов, да еще неплохо бы немного нагрузить цепочку, чтобы заведомо исключить влияние зазоров.
Между тем, в буржуйских инет-лабазах давно уже продаются такие девайсы марок Park Tool, Rolhoff и менее знатных. Работают они по простейшему принципу ПР-НЕ. Кто не изучал метрологию, поясню.
Калибр ПР-НЕ имеет две стороны - проходная (ПР) и не проходная (НЕ). Когда измеряют какой-нибудь размер, сначала используют проходную сторону калибра. Она должна проходить (в общем случае совмещаться с измеряемой деталью без явного сопротивления, то есть с гарантированным зазором). Потом калибр переворачивают не проходной стороной и проводят попытку еще раз. На этот раз калибр ни в коем случае не должен нормально совмещаться с измеряемой деталью, то есть должен быть нагяг.
Аналогичным образом работает цепной двусторонний калибр. С той лишь разницей, что на два калибровочных размера у него три диапазона измерений. Принято, что износ цепи, соответствующий ее максимально допустимому для эксплуатации состоянию, составляет 1%.
Измерение ведется на довольно любопытном количестве звеньев. Это не 12 полных, и даже не половинка от данного количества. Калибр меряет цепь на расстоянии 5 полных звеньев минус диаметр ролика цепи. Сколько это точно - можете подсчитать, гладя на смостряченную мною картинку. Это 119,7 мм. Это для абсолютно работоспособной новой цепи без износа. Назовем эту длину L0.
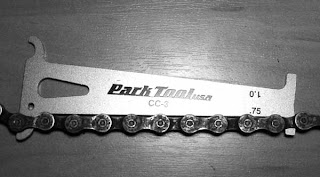
Далее следует цифра 0,75%. Увеличим на эту величину наши 119,7 и получим 120,6 мм (L0,75). Это и есть первый ПР-НЕ-шаблон, по которому меряют износ цепи. Если калибр стороной 0,75 не вставляется между указанными на картинки роликами цепи, значит цепь вполне себе живая и ее можно смело использовать в дальнейшем.
Другая сторона калибра называется 1,0 и имеет длину... правильно, 120,9 мм (119,7х1,01). Это второй ПР-НЕ-шаблон. Если сторона 0,75 вошла в цепь, а сторона 1,0 все же не влезает в отведенное для нее пространство (то есть износ цепи составляет от 0,75% до 1% на длине L), то стоит призадуматься о смене цепи, иначе она настолько износит кассету, что вскоре придется менять то и другое. Если замените цепь, то кассета потребует приработки. Пусть величина 120,9 мм будет называться L1.0
Ну а если обе стороны калибра пролезают в цепь на нашей длине L - значит абзац и цепи, и, скорее всего, кассете. После замены цепи приработка кассеты будет осуществляться очень, очень, долго... терпеть постоянные "прокруты", связанные с прыжками цепи на кассете, вы настолько долго не сможете. А если сможете, то вам остался последний шаг к просветлению на пути к состоянию нирваны
Вот и вся премудрость. Всего одна железка за 15 баксов - и никаких проблем из измерением длины цепи. Но мы - русский народ, и кормить буржуев не будем! Поэтому обойдемся без калибра. Зная указанные выше циферки, можно для определения износа методом буржуйского калибра обойтись одним лишь штангенциркулем с губками для измерения внутренних размеров. Этот инструмент просто обязан быть дома у любой добропорядочной домохозяйки.

Итак, устанавливаем на инструменте 119 мм, просовываем его в цепь внутренними губками и развигаем их до упора. Смотрим результат.
Справедливости ради нужно привезти и размеры по методике измерения 12 полных звеньев. Считается, что измерения нужно вести по центрам осей пинов цепи, что не очень легко. Однако ничто не мешает выбрать точкой измерения боковую поверхность пина или даже звена - сильно от этого точность не пострадает.
304,8 мм - новая цепь.
Особо умные (в хорошем смысле слова) байкеры дают ссылку на растиражированный с www.bike-repair.ru материал, в котором умудренные летами байкеры со стажем говорят, что длина двенадцати полных звеньев цепи в нулевом состоянии должна составлять 304,8 мм, а рекомендуемое значение износа цепи, при котором ее нужно менять, составляет столько и столько... (ниже процитирую). Одно но: для точности измерения цепь неплохо бы снять с велика, вымыть и высушить, а еще измерять ее строго по центрам пинов, да еще неплохо бы немного нагрузить цепочку, чтобы заведомо исключить влияние зазоров.
Между тем, в буржуйских инет-лабазах давно уже продаются такие девайсы марок Park Tool, Rolhoff и менее знатных. Работают они по простейшему принципу ПР-НЕ. Кто не изучал метрологию, поясню.
Калибр ПР-НЕ имеет две стороны - проходная (ПР) и не проходная (НЕ). Когда измеряют какой-нибудь размер, сначала используют проходную сторону калибра. Она должна проходить (в общем случае совмещаться с измеряемой деталью без явного сопротивления, то есть с гарантированным зазором). Потом калибр переворачивают не проходной стороной и проводят попытку еще раз. На этот раз калибр ни в коем случае не должен нормально совмещаться с измеряемой деталью, то есть должен быть нагяг.
Аналогичным образом работает цепной двусторонний калибр. С той лишь разницей, что на два калибровочных размера у него три диапазона измерений. Принято, что износ цепи, соответствующий ее максимально допустимому для эксплуатации состоянию, составляет 1%.
Измерение ведется на довольно любопытном количестве звеньев. Это не 12 полных, и даже не половинка от данного количества. Калибр меряет цепь на расстоянии 5 полных звеньев минус диаметр ролика цепи. Сколько это точно - можете подсчитать, гладя на смостряченную мною картинку. Это 119,7 мм. Это для абсолютно работоспособной новой цепи без износа. Назовем эту длину L0.

В данном случае цепь имеет износ более 0,75% и ее уже лучше заменить.
Далее следует цифра 0,75%. Увеличим на эту величину наши 119,7 и получим 120,6 мм (L0,75). Это и есть первый ПР-НЕ-шаблон, по которому меряют износ цепи. Если калибр стороной 0,75 не вставляется между указанными на картинки роликами цепи, значит цепь вполне себе живая и ее можно смело использовать в дальнейшем.
Другая сторона калибра называется 1,0 и имеет длину... правильно, 120,9 мм (119,7х1,01). Это второй ПР-НЕ-шаблон. Если сторона 0,75 вошла в цепь, а сторона 1,0 все же не влезает в отведенное для нее пространство (то есть износ цепи составляет от 0,75% до 1% на длине L), то стоит призадуматься о смене цепи, иначе она настолько износит кассету, что вскоре придется менять то и другое. Если замените цепь, то кассета потребует приработки. Пусть величина 120,9 мм будет называться L1.0
Ну а если обе стороны калибра пролезают в цепь на нашей длине L - значит абзац и цепи, и, скорее всего, кассете. После замены цепи приработка кассеты будет осуществляться очень, очень, долго... терпеть постоянные "прокруты", связанные с прыжками цепи на кассете, вы настолько долго не сможете. А если сможете, то вам остался последний шаг к просветлению на пути к состоянию нирваны
Вот и вся премудрость. Всего одна железка за 15 баксов - и никаких проблем из измерением длины цепи. Но мы - русский народ, и кормить буржуев не будем! Поэтому обойдемся без калибра. Зная указанные выше циферки, можно для определения износа методом буржуйского калибра обойтись одним лишь штангенциркулем с губками для измерения внутренних размеров. Этот инструмент просто обязан быть дома у любой добропорядочной домохозяйки.
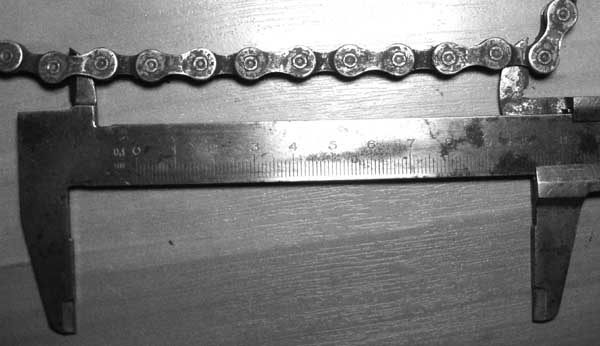
Штангенциркуль менее удобен чем калибр, но в умелых руках тоже сгодится.
Итак, устанавливаем на инструменте 119 мм, просовываем его в цепь внутренними губками и развигаем их до упора. Смотрим результат.
От 119,7 до 120,6 мм - нормальный износ, замена цепи не требуется.
От 120,6 до 120,9 мм - требуется замена цепи, возможен период приработки цепи к кассете и взаимно.
Более 120,9 мм - надо менять и цепь, и кассету.
Справедливости ради нужно привезти и размеры по методике измерения 12 полных звеньев. Считается, что измерения нужно вести по центрам осей пинов цепи, что не очень легко. Однако ничто не мешает выбрать точкой измерения боковую поверхность пина или даже звена - сильно от этого точность не пострадает.
304,8-306,4 мм - цепь в норме.
306,4-307,9 мм - цепь изношена, и в дальнейшем потребуется приработка цепи к кассете.
307,9 мм или больше - цепь изношена очень сильно, кассета и звезды системы - наверняка тоже. Рекомендуется минимум замена цепи и кассеты. Обычно износ звезд системы неравномерен - наиболее подвержена иму вторая (средняя) звезда, меньше - третья. Поэтому можно обойтись заменой только их. А вообще, для определения износа звезд существует отдельная методика, но это - тема не менее отдельной беседы, но когда она состоится - не знаю. О том же, каков механизм собственно износа цепи - постараюсь рассказать в ближайшее время.
Оригинал статьи на http://norcoroman-zip.livejournal.com
Как снять портрет с одной вспышкой
Recommended Gear


1. Your camera and lens to start with. All of these portraits were made with a Nikon D700 using a 24mm, 50mm or 85mm lens.
2. A stand-alone flash unit (that means no pop-up flashes) that can be adjusted manually.
3. Something that allows you to fire the flash without it being on the camera. This might be a special cord, or it could be a wireless system. I use a Cactus wireless flash trigger, which will work with almost any shoe-mount flash.
4. A convertible photo umbrella for some of the images. “Convertible” mean that the inside of the umbrella is shiny, but the black cover on the outside can be removed.
5. Though not used in this tutorial, a reflector disc or board could be substituted in many places.
6. A couple of light stands to hold your flash and umbrella or reflector properly.
Outside vs. Inside
This tutorial will utilize two broad techniques. We will work outside balancing light from the sun with light from a flash, and we will work inside using just a flash.
While you can balance “ambient” light with light from a flash when working inside, this has not been done in any of these portraits. So let’s start outside where the sun will substitute for having a second flash.
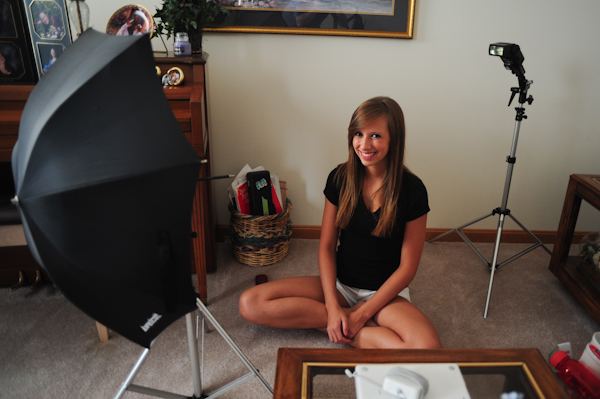
Example 1. Simple Fill Light
In this first example, it is evening and the sun is shining toward the subject from her left. As you can see in the example below, half of her face is in shadow and light is very flat. The background is very busy and distracts from the subject. This wide overview shows both the subject in natural light and the light stand holding a flash. The flash has no modifiers and is pointed straight at the subject.

The Finished Portrait
In order to use the flash correctly, I found the exposure for the ambient (natural) light. I then under exposed it by one stop, and adjusted my flash to match. This sets the subject apart from the background by making it darker. The fence is also illuminated. Because the flash is relatively far away from the subject, it covers a wide area.
Because the light from the sun is still hitting her, and the flash is directed more toward the shadowy side of her face, the light appears very even. This technique is good for obtaining clear, easily identifiable images. Viewers would be able to identify the subject even in a wallet-sized print.

Example 2. Simple Rim Light
You’ll notice in the set-up photo below, that I have repositioned the flash behind the subject. The sun will act as the main illumination for the image, and the flash is going to act as our rim light. Rim lights illuminate the edges of the subject and are usually brighter than the main light (in this case, the sun). Unlike the last portrait, I am not underexposing the ambient light. In fact, I’m over exposing the flash to create highlights.

The Finished Portrait
Pay special attention to the subject’s shirt and hair. The far right edge (from the viewer’s point-of-view) of both are almost white. Because the flash is behind the subject, but not directly behind, the light falls just around the edges. You can also see this effect on the fence post in the foreground, and just slightly on the subject’s face.

Example 3. Diffused Rembrandt Lighting
Rembrandt lighting is when the light is 45 degrees to the side of the subject and 45 degrees above the subject. Many of Rembrandt’s painted portraits were lit in this manner.
For this image, I have also added the umbrella. The flash is in the umbrella pointing at the middle of it which causes the light to be softer and cover a larger area, but it also causes it to be less powerful, which is why the flash is so much closer to the subject than in the previous photos. You can see that the ambient light is hitting very little of the subject’s face.

The Finished Portrait
As you can see, the right side of the subject’s face and body (from our point-of-view) is still illuminated by the sun, but the sun is by no means our primary light source. The flash is filling in all the shadows that were there and also evening out the exposure of the wood around her.
The sun is doing wonders for the subject’s hair and creating a warm tone on her leg, but isn’t doing much for her face. In terms of exposure for this image, I exposed for the highlights on the subject with the leg and arm being lit by the sun, and allowed the rest to fall into shadow. I then cranked up the flash until I achieved the exposure I wanted.

Example 4. Hair Light
When using the sun as your main source of light, we already talked about how the flash can be used as a general fill light or a rim light. It can also be used as a hair light. As you can see the in the set-up photo below, the sun is directly facing the subject. It’s so bright that she’s squinting. Her face is naturally lighter than her hair color, so in order to even out the exposures between her hair and her face, I pointed a flash at it.

The Finished Portrait
To achieve the type of light I was looking for, I decided to remove the cover from my convertible umbrella. So instead of the flash shooting it’s light into the umbrella and the light reflecting off of it and then hitting the subject, the light is coming through the white portion and being diffused in a different way.
You can see how the light from the flash hits her hair and creates a pleasant sheen in the finished portrait below:

Example 5. Sunglasses Inside
Now let’s move inside. In the rest of the examples, all of the light that makes up the image will be provided by the flash. While I am using ambient window light to create the set-up photos, the windows are in no way affecting the outcome of the image.
The flash is exponentially brighter than the light coming from the windows and overpowers it completely. In the set-up image below, you can see that I’ve had the subject put on her sunglasses and look directly at the same lighting set-up I used for the hair light above.

The Finished Portrait
The final product is very similar to a famous portrait of a rock star. I believe it was Slash, but I cannot verify that. If someone knows of the portrait I’m talking about, please post a link in comments!
Anyway, the reflection of the umbrella creates an interesting image in the sunglasses, and the lighting makes the colors of everything really pop.

Example 6. Flash in the Back, Reflector in the Front
Let me make this clear, the umbrella in this set-up image is empty. I am simply using it as a reflector. In fact, a reflecting disc or even a large white piece of poster board would have worked better in this situation.
The light from the flash is coming over the top of the subject’s head and then bouncing off the umbrella and hitting her face. The idea with this arrangement is to create a rim light in the background and use the reflected light as my main source of illumination.
The Finished Portrait
As you can see in the final image below, her face is softly lit with the reflected light and her hair is picking up the direct flash from behind. The hair is a little too bright for my tastes. If I could do this photo again, I would have the subject tilt her head differently to make the highlight on the top of her head smaller.
Another option would have been to lower the flash further behind her head, so it wasn’t hitting so much of the top. Learn from my mistakes and pay close attention to how much rim light your flash is creating.

Example 7. Dramatic Overhead Lighting
This is a more specialized technique. I wouldn’t suggest using it often because it can be a bit cliché. It can lend a certain isolation or religious overtone to your imagery. It can also be used to completely black out a background.
You can see in the set-up that the flash is almost directly above the subject’s face, and just slightly in front of it. In almost all cases, the subject needs to look up or else shadows will darken her eyes and her nose would cast an unflattering shadow as well.

The Finished Portrait
As you can see, the portrait has a very dark background. And it does create a “floating head” effect because the neck is completely in shadow. I chose to keep the neck in the frame so the subject’s necklace would be visible. But when using this technique, it’s easy to compose the shot so only the face is visible.

Example 8. The American Apparel Look
If you’ve seen ads for the clothing store called American Apparel or certain trends in other fashion commercials, then you’ve seen shots using this technique. In this set up you’ll see that the subject is very close to the wall. The flash is in the umbrella and I used a wide angle lens. I stood directly under the umbrella and used a wide angle lens. I set my flash to a low-medium power for this shot because it was so close to the subject.

The Finished Portrait
The final effect for this image is a little hard to describe. Notice the vignette around the edges of the frame. You can also see that the light source (the big umbrella) being bigger than the subject, and so close, allows there to be virtually no shadows. The overall impression is half police lineup, half point-and-shoot snap shot.

Example 9. Everything In Close
This technique is similar to the “Flash in the Back, Reflector in the Front” set-up, but the flash is directly behind the subject. Like that technique, the umbrella is empty and could just as easily be substituted with a reflector.
The umbrella is directly in front and above the subject instead of to the side. And this technique utilizes the close proximity of the flash and umbrella like the technique above. I was situated close to the subject as well with a 50mm lens.

The Finished Portrait
The light in this image is very soft. The high angle and proximity of the umbrella allows it illuminate the face and act as a hair light at the same time. The flash positioned behind the head gives the very edges of the hair a glowing look.
This set up does the opposite of the “Dramatic Overhead Lighting” when done next to a wall. It makes it completely white. You will also notice in the finished image that the light on her hand is a little too bright.
This could be solved in two ways. One, have her tilt her hand in a different way. Two, move her hand further away from the light in some way.

Example 10. Up Against The Wall
Suppose you don’t have a reflector or umbrella. A white or light-colored wall can be used to make a dramatic portrait with just one light. You’ll notice that the flash is bare again and has been moved farther away. The wall is acting as a reflector, but the versatility and simplicity of this technique is what makes it so valuable.

The Finished Portrait
As you can see, the face is nicely lit and background is very dark. Because almost everywhere you go, you could set up a portrait like this, I want to share some variations with you. You can slow your shutter speed way down to 1 or 2 seconds to allow the background to become visible again. This would create more of an environmental portrait. You can also move the subject into a corner to create a solid white background.

Final Conclusion
Fancy studio strobes with softboxes and umbrellas and seamless backdrops are great. But if you don’t have the money, the room, or the strength in your back to carry all the gear, just remember that you can create stunning portraits using a single light and some smart tricks.
Thanks for reading. And go search Google for the that famous rock star portrait!
Оригинал статьи на tutsplus.com


